Last 4th of July weekend, my raw water pump went bad on me while underway. The damage done to the raw water pump housing required a replacement of the entire housing. Unfortunately, this little incident ended my boating season WAY too early last year. However, the silver lining is that I had to take apart the raw water pump to replace the raw water pump housing. The procedure is pretty much the same thing as what you would have to do in order to do an impeller change.
Yesterday I installed my new raw water pump housing in preparation for boating season.
So today we all learn together! I'm posting this based on my application of a 2007 Mercruiser 350 MAG MPI with a Bravo 3 with the air-actuated drain system but if you have a newer Merc with a Bravo 3 the setup is probably pretty similar.
All you will need for this project is a slot head screwdriver, a set of open end wrenches (SAE & metric), a set of sockets (SAE & metric), a set of SAE deepwell sockets (or at least a 9/16" deepwell), a short and long extension for your socket set, a pair of pliers/channel locks, and a tube of water-soluble lubricant (dish soap, KY, whatever you use around the house

)
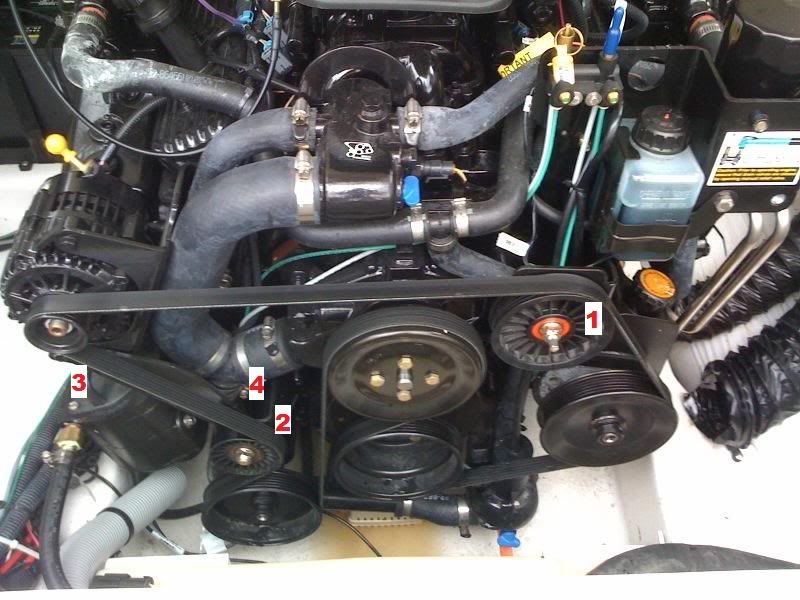
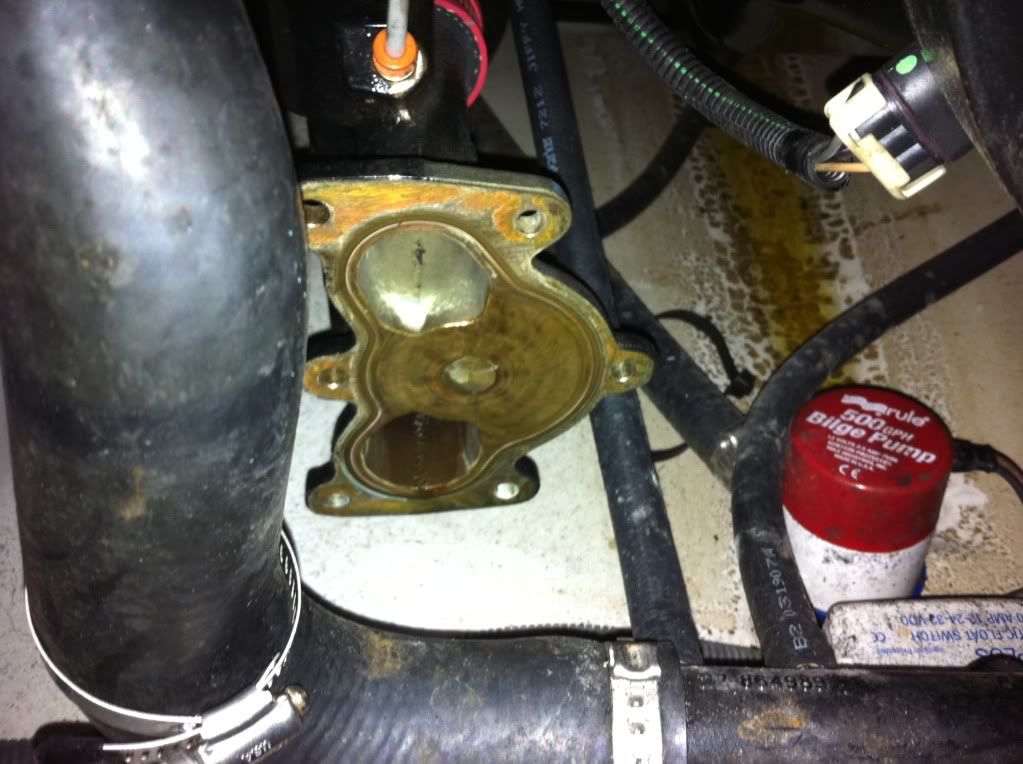
(Note the red numerals in the white boxes in this photo. They are the steps in which you should proceed)
DO NOT jack with trying to disconnect hoses on the stern side of the raw water pump, fuel filter, or anything else. There is no need to disconnect ANYTHING other than what these instructions lay out. Just drain the water from the engine and then proceed as follows:
1. Loosen the belt tensioner using an open end wrench. Remove the serpentine belt. Note that there is a diagram for belt routing in this picture. If you don't have this diagram, or if yours is different, you might want to snap a picture or draw it out. The serpentine belt will probably NOT fall off and will probably still be pretty tight on the pulleys so CAREFULLY remove the belt. (I learned on re-assembly that my belt was very tight to put back onto the pulleys even with the tensioner at the least tense location.)
2. Remove the bolt and remove the nut from the stud holding on the port side of the idler pulley bracket. The bolt will come out with a socket and long extension. The nut requires a deep well socket because of the length of the stud on the engine.
3. Remove the nut and bolt combo which attaches the starboard end of the idler pulley bracket to the alternator. With the belt still being installed in this pic, you cannot see the nut/bolt combo but it is right below the alternator pulley and the hole for the nut/bolt combo is actually part of the alternator. My apologies for not taking a close up after belt removal.
4. Remove the hose clamp from the vertical hose leading into the Y-connection of hoses.
Moving on:
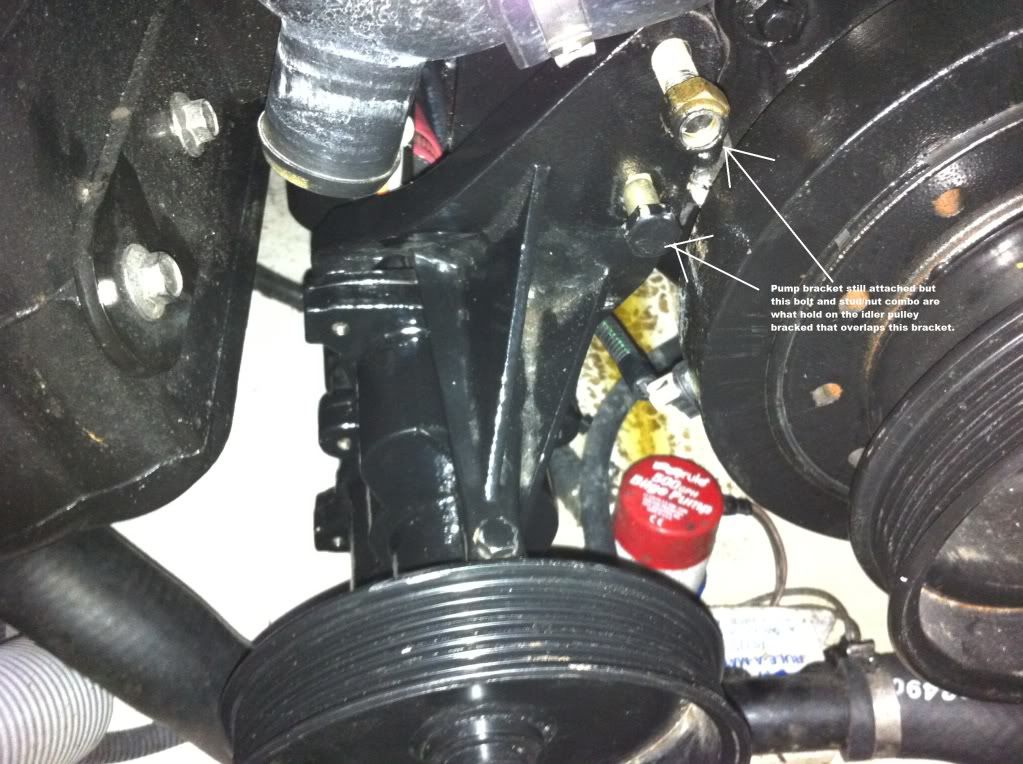
Close up of the raw water pump upon removal of the idler pulley bracket and after pushing the vertical hose leading into the Y-connection of hoses to the starboard side so that it is out of the way for this procedure. This is the area where the "2" is in the pic above. (Apologies for misspelling bracket as "bracked"

). As noted in the pic, reinstall the bolt to keep everything in place for the time being. I put the nut back on the stud just so I wouldn't lose it until I was ready for complete removal.
There are 6 bolts total which hold the raw water pump to the raw water pump bracket and all of them are removed from the stern side. As you can see from this pic, there are 3 bolt holes on the starboard side. What you can't see in this pic is that the other 3 are on the port side of the raw water pump, right behind the raw water pump bracket in pretty much the same place symmetrically. Remove only the 2 bolts attaching the raw water pump to the bracket. As you look from bow to stern at the pump, the 2 bolts to remove are the one on top on the starboard side and the one in the middle on the port side. You cannot see these bolts looking at them from the bow side. You have to put your hand back there and feel them. If I recall correctly, they are all 10mm bolts. Have patience. The one in the middle on the port side is difficult to reach and requires lots of tiny turns with that open end wrench. Use the box end of the wrench if you have it.
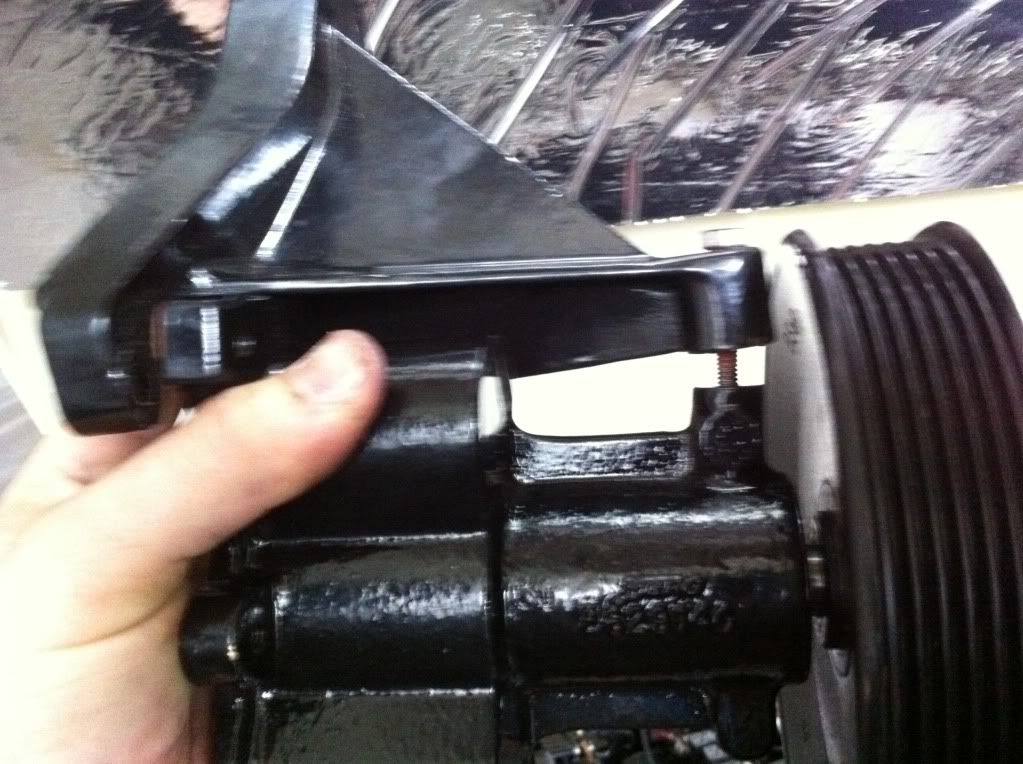
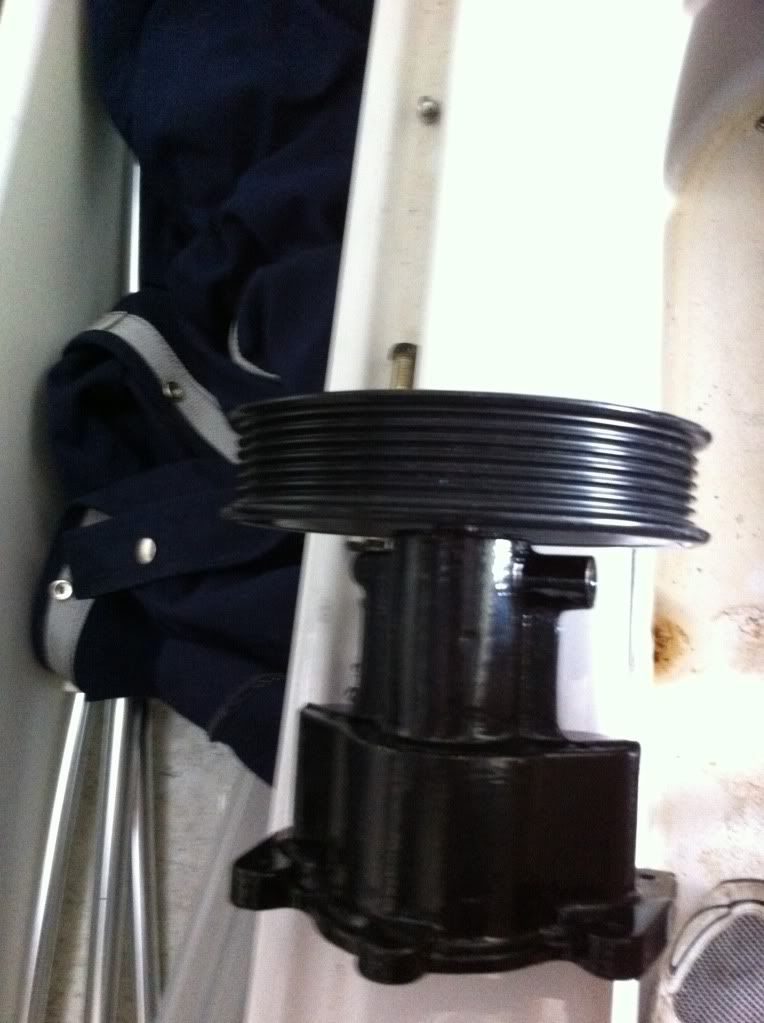
Once you have removed these 2 bolts, remove the single bolt you can see right behind the pulley which is at the part of the raw water pump bracket that is closest to the bow. The pic below shows a shot from the side of the raw water pump housing and the raw water pump bracket to illustrate where this bolt is located.
Continuing on....
Once you have the raw water bracket removed from the raw water pump, remove the raw water bracket from the motor and set it aside.

Remove the 4 bolts remaining on the stern side of the raw water pump. These should be a little easier to get to because now the raw water pump is free of the bracket and it can be moved a bit.
Continuing on....
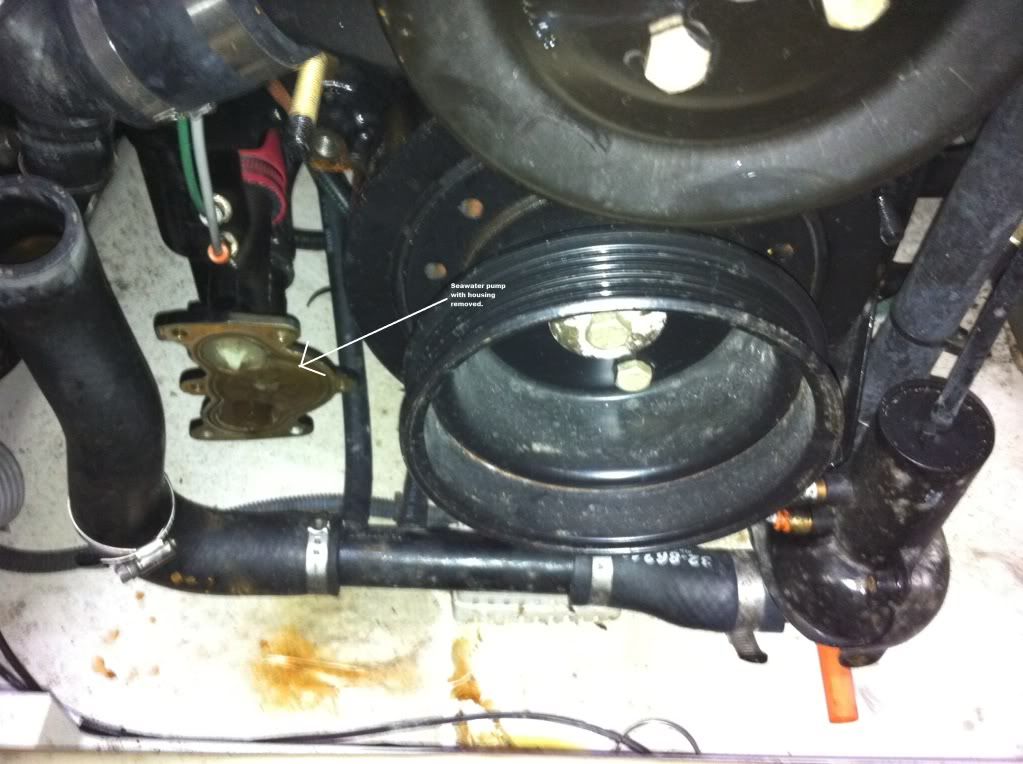
Here is what everything looks like with the raw water pump housing and the raw water pump bracket removed.
Here is what the raw water pump housing looks like after removal.
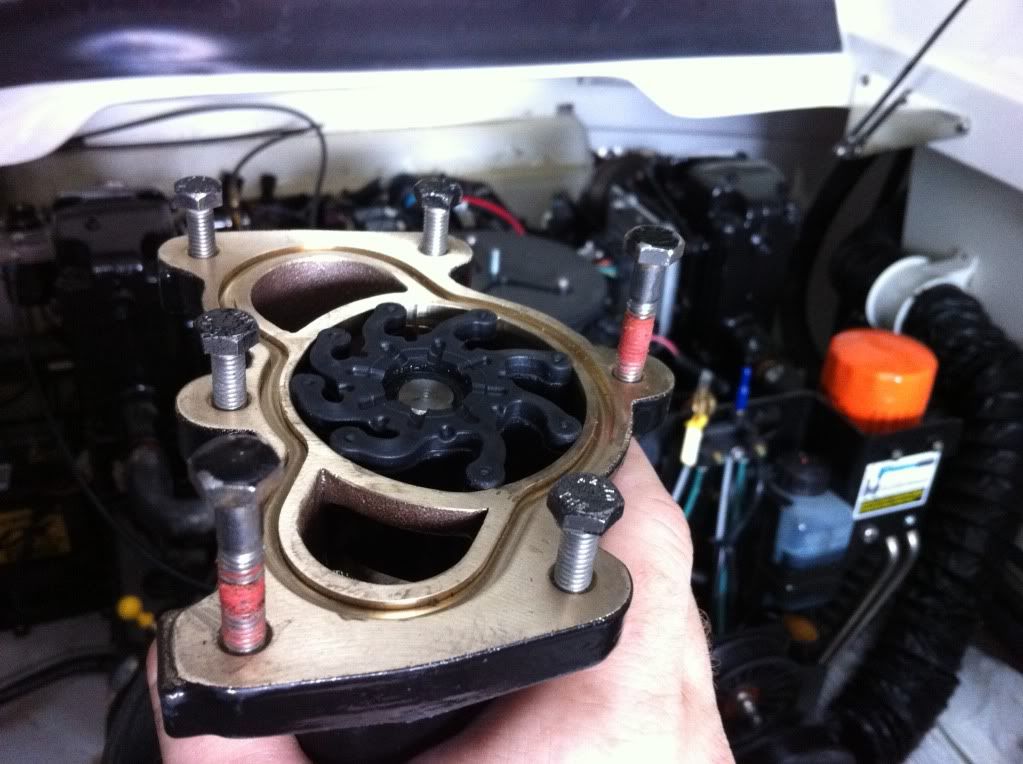
Here is what the stern side of the raw water pump housing looks like.
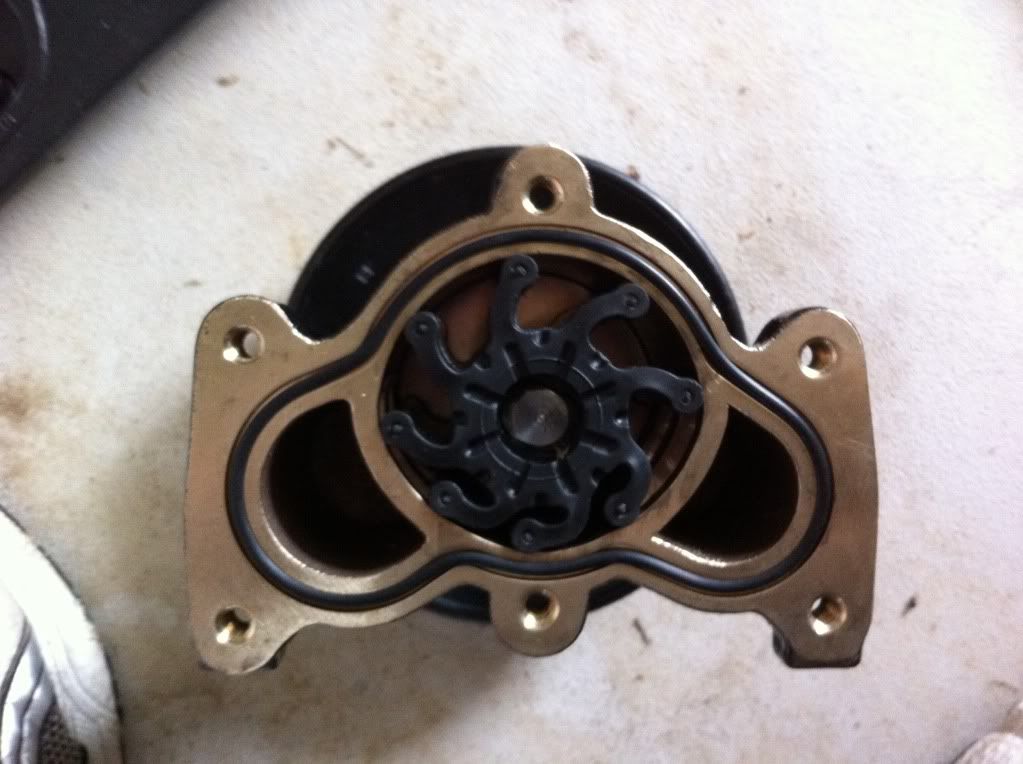
You will see our friend the impeller in there. Note the direction the veins. Use your pliers to reach in there and grab a rubber part of the impeller and pull it out toward you. Nothing should be removed besides the impeller and the o-ring that sits on the stern side of the raw water pump housing.
Once you remove the impeller, coat the inside of the raw water pump housing and the vanes on the new impeller with your lube of choice. Match up the shape of the impeller's hub with the raw water pump's shaft and push the impeller onto the shaft. Turn the pulley as you push so that the veins will move in the proper direction.
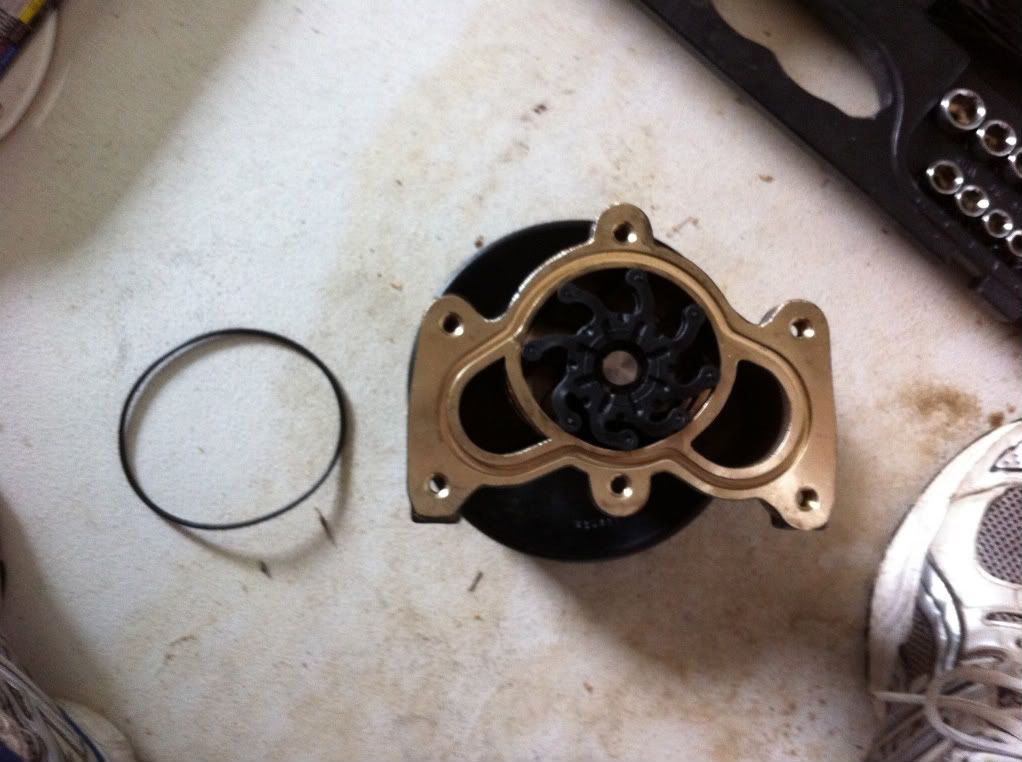
Once you have the new impeller installed, reinstall the o-ring (or even better-replace it!). Do not use lube for this-you want that o-ring to seat in there and stay there.
New impeller and o-ring installed and raw water pump housing is ready to go back on.
BEFORE putting everything back together, take a close look at the raw water pump to see how this all fits back together:
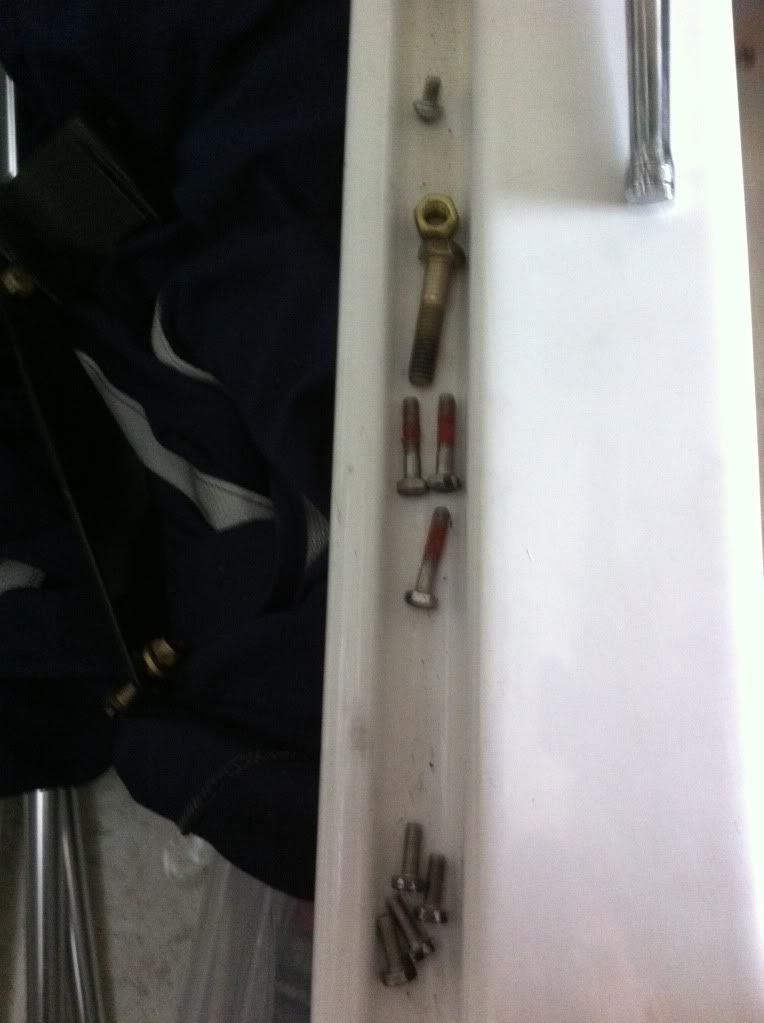
Note that there are 4 bolts (bottom of pic) that are the same; 3 more of the same diameter but a longer length with thread-lock on them (center of pic) and a bolt and nut that I have put together to keep them from getting lost. The 4 bolts are the last 4 removed from the raw water pump when removing the raw water pump housing. The 3 longer bolts are the 3 used to mount the raw water pump to the raw water pump bracket. The bolt/nut are the ones used to mount the idler pulley bracket and raw water pump bracket to the engine at location "2" in the very first pic.
More on preparing for reassembly:
Note the holes for the bolts and remember (from disassembly and the pics above) that the 4 short bolts go in certain holes and 2 of the 3 longer bolts go in the top starboard and middle port holes.
This pic shows the 4 short bolts and 2 of the 3 longer bolts in their proper holes. The bolt closest to us in the picture is the top starboard bolt. You would just turn the raw water pump housing down vertically from the way I'm holding it here to have it in proper position for reattachment.
From this point, you are simply reversing the steps from above to put everything back together. Again, patience is required to re-attach the raw water pump to the raw water pump bracket since there is a small space to work.
Important things to keep in mind during reassembly:1. Make sure the o-ring is properly seated in the raw water pump housing before reassembly. This keeps it from coming off while you are trying to re-attach the raw water pump housing to the raw water pump. If that happens, your pump is going to leak and you're going to have to do all of this again. THAT is why you don't want your lube of choice used to install the new impeller anywhere near the o-ring when you seat it.
2. Put the raw water pump bracket back into place on its mounts and just finger tighten the bolt/nut assembly. This will hold it in place before you attach the raw water pump to it. You cannot attach the pump to the bracket and then try to attach the whole assembly to the engine. The mounting stud is too long to allow that; the hoses connecting to the stern side of the raw water pump do not extend far enough to allow you to pull the pump toward the bow enough to slip the bracket over the stud with the pump attached to the bracket. It is not worth trying to detach the hoses on the stern side of the pump (especially if you have the air-actuated drain system like I do) so you are stuck doing it this way. The only thing that MAY help is to not reinstall the bolt and just hang the raw water pump bracket on the stud so that you get a tiny bit of movement. This didn't really help me, but maybe it will help you.
3. Once you get the raw water pump securely mounted to the raw water pump bracket using ALL 3 of the longer bolts, remove the bolt/nut combo that you finger tightened in reassembly step #2 (the one right before this paragraph). Why? Because the idler pulley bracket uses the same stud and bolt to mount and it overlaps the raw water pump bracket. So, if you torque the raw water pump bracket down before reinstalling the idler pulley bracket you're going to have to undo all of that.
4. Don't forget to reinstall that hose and clamp which run vertically up into the Y-connection of hoses!!!!
5. The serpentine belt is going to be a TIGHT fit once you get it routed properly. It will be tough to get on (at least mine was) but be careful and patient and don't force it.
6. Don't forget to replace your drain plugs on your engine!
Good luck!


