www.iFourWinns.com

Dedicated to Current and Future Owners
It is currently Fri May 02, 2025 11:09 am

All times are UTC - 6 hours [ DST ]


Post new topic Reply to topic  [ 14 posts ] 
Author Message
PostPosted: Mon Jun 30, 2008 7:18 pm 
Offline
email admin your custom rank

Joined: Wed Mar 12, 2008 9:49 am
Posts: 401
Location: Eastern Canada
OK, so I finally got the stereo done. It was a lot more work that I anticipated :? but to be fair I was probably fussier than a hired hand would have been (I.E. someone who knows what they’re doing).
Since others have already posted this upgrade a number of times in the past I will try to keep it focused mainly on the little extras I chose to do. This post may offer a little interest to those of you who also have an H200 or H210 as the install is specific to those models (bench is prob a tiny bit narrower on the 200 :!: ).
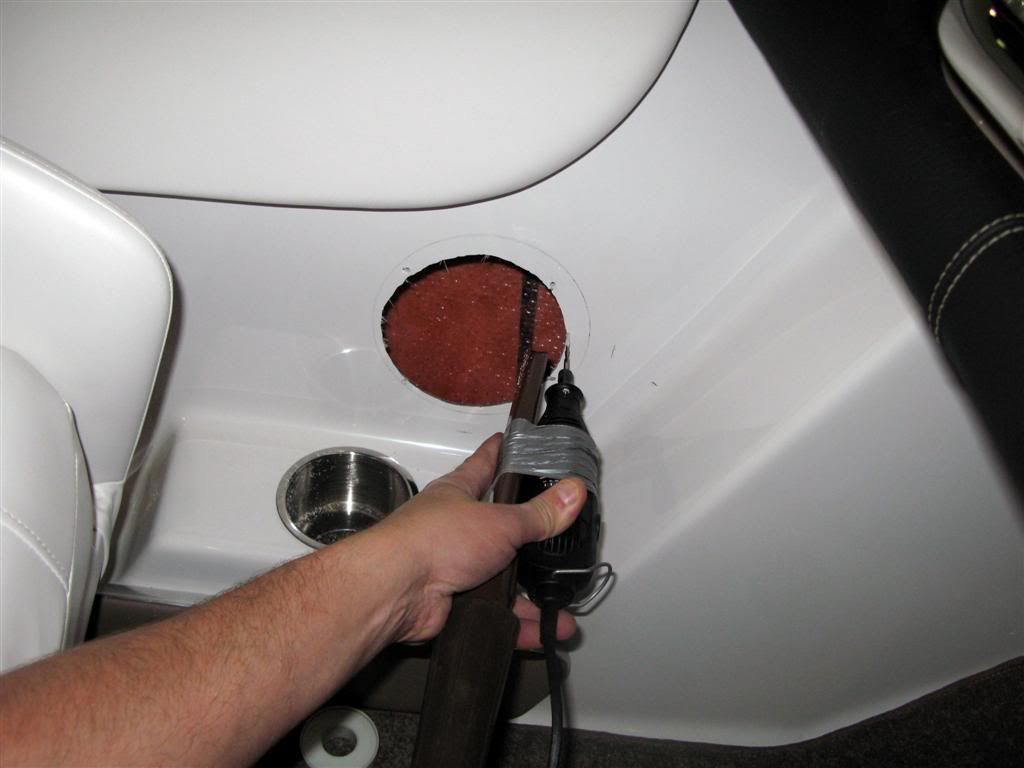
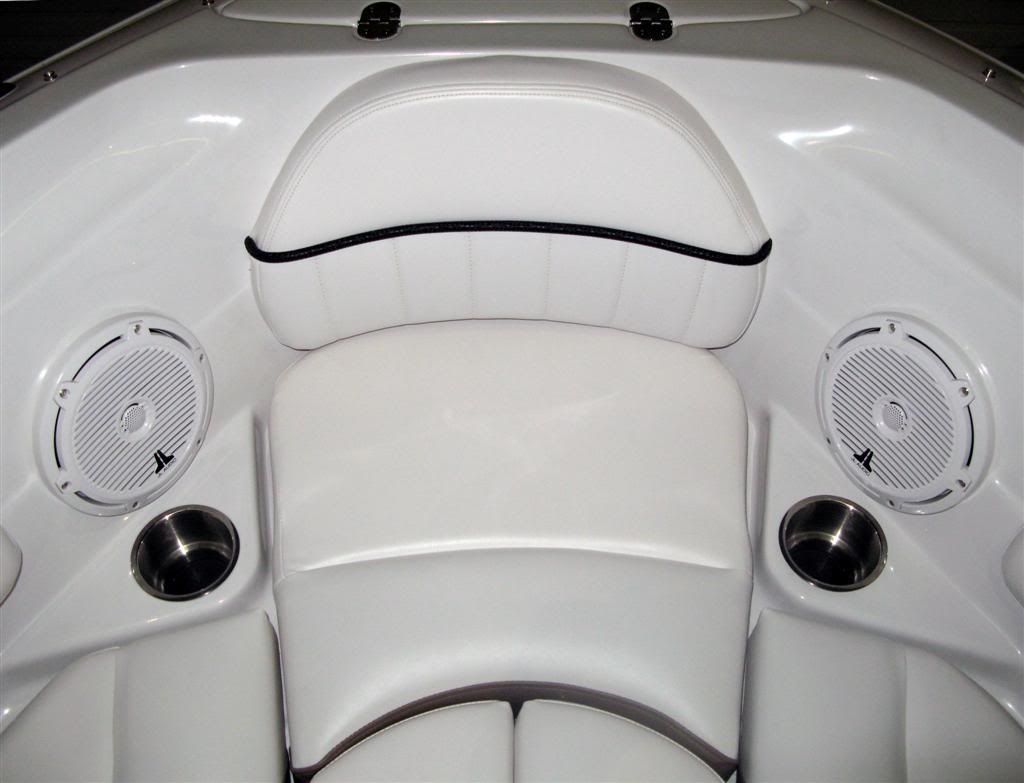
First the original 6" speakers were removed in favor of the 7 3/4" JL coaxial units (wicked awesome advice CC - THEY ROCK!) and the holes were enlarged accordingly. Check my fancy no-name Dremel with custom dust vacuum system! By the way these are as big a speaker as you will get in the bow location of a 200 or 210. Actually, if they were 1/8" or even 1/4" dia smaller they would have fit absolutely perfect - but they do fit and you have to really look to see that they have a tiny edge over the "inlaid swoop" of the interior. Bow docking lights do not affect the ability to install as I have those as well (I had my concerns).

Image

Image

Image

Factory speaker wires were terminated, sealed and abandoned then new 16ga wires run. All new wire connections got rubber capped blk/red female connectors, dielectric grease and heatshrink to seal them off. All new wiring was either tied off to the original harness with zip-ties or anchored with nylon wire anchors. The power or pricey stuff got a plastic loom to protect them from chafing.
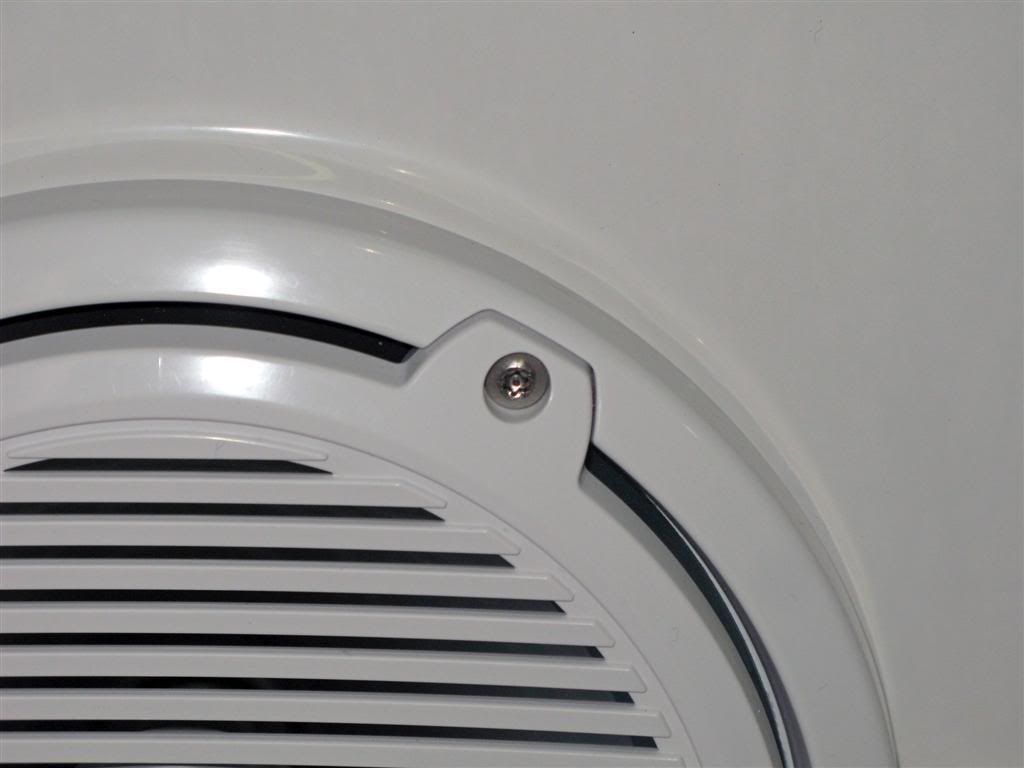
Strangely, the bow speakers have a plywood backer but the helm speakers did not. Enlarging the holes killed most of the existing speaker backers so I made 4 new rings with a hardwood 1/2" ply - varnished and installed them. Why bother? Well to keep my gear mine I invested in #10 1 3/4" SS screws that not only require a special pinout torx type bit to remove but they are also threaded in reverse so when you would think you are loosening you are actually tightening. They are designed to strip when over tightened so then they would need to be drilled out. I am gambling that requires a little more ambition than the little thieving a$$h0le$ have.

Image

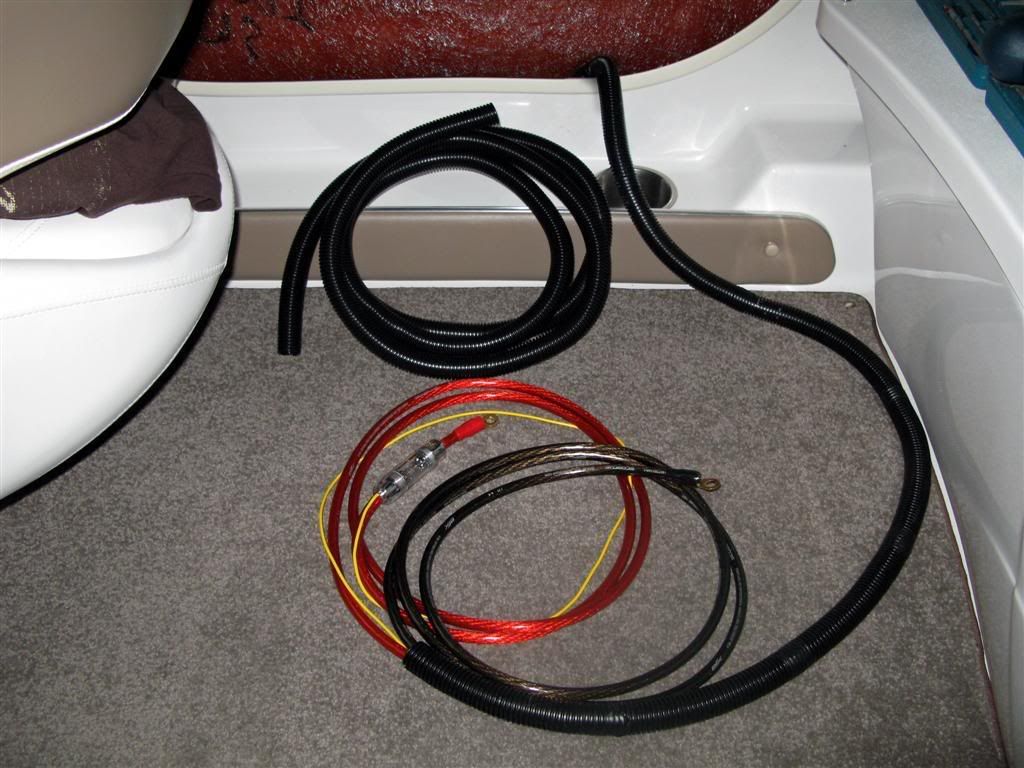
The 4ga amp power and ground is then run. They were run down the stbd. side by removing the lower interior cubbies (what a pain to get at the top/inside phillips screws and if you strip one - good luck - Best to use a phillips bit in a 1/4" ratchet). Ran the cables inside of a 3/4" wire loom with an additional 20ga wire (yellow) which I will later use for the setup memory to the Sony head unit (this should be factory IMHO). Again, zip-tied to the factory harness where possible and anchored to the backer where the amp is to be mounted. The loom is run along the foam bottom under the stbd. pass compartment so I simply used a blob of that expanding/insulating crack foam to glue the thing down in a couple of spots. Stuff dries hard and sticks like crazy so the loom is pretty secure. Installed the 60A fuse holder in the cubby beside the engine, trimmed the wires and as usual sealed everything with dielectric grease and heatshrink.

Image

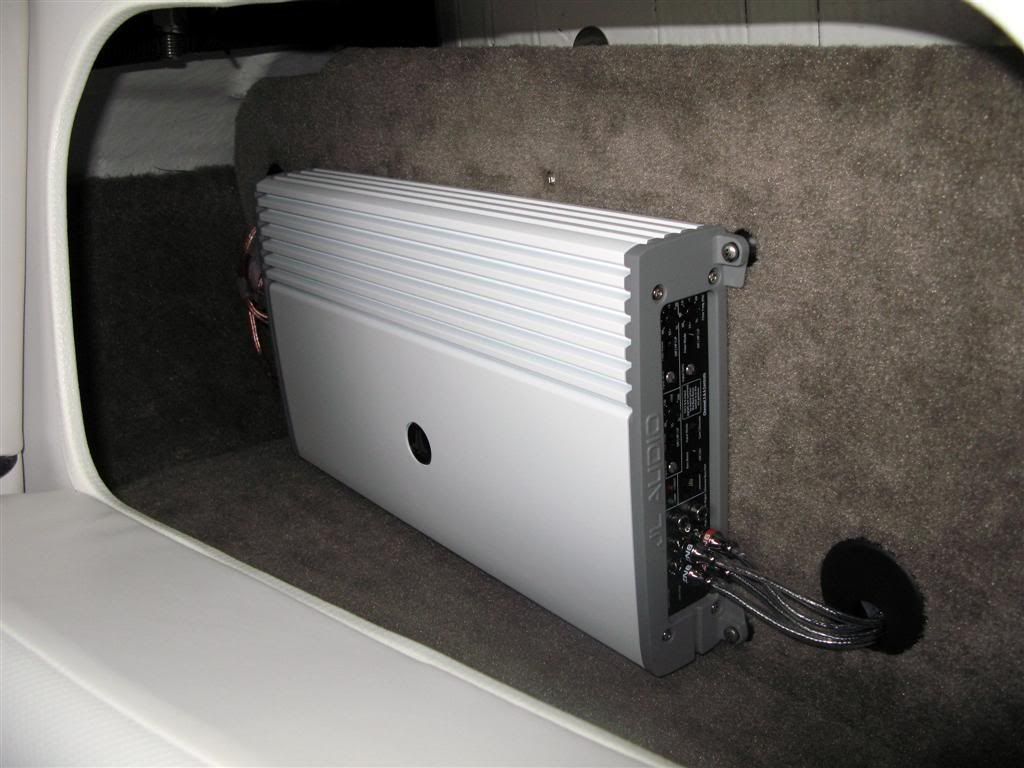
I then removed the carpeted backer in the bow seatback storage to mount the amp. Used nylon anchors to attach any wiring to the back and installed 2 desk/cabinet wire chase covers to keep it tidy. The amp was mounted with SS bolts and security nuts then pinned with cotterpins. The board is then secured with hex lugs to the excess bolt ends that secure the helm to the hull liner on the other side. Along the edges the board is secured with the same security screws as the speakers. The result is the backer board must be removed in order to remove the amp which of course will be at least as difficult as the speakers would be. Since the amp is secured to the board until the board is removed from the cubby it is a real task getting the assembly in and out of the storage compartment. There is a trick - the cubby bottom board has to come out first and they must be juggled around in there before anything will come out - and it will barely wiggle out one way only. Oh, the seat back door must come off first as well. :twisted: You might note the amp is mounted with standoffs as well - just thought it may be good to have a bit of space between the amp and carpet such as to avoid trapping any heat; although it is hard to see in the pics.

Image

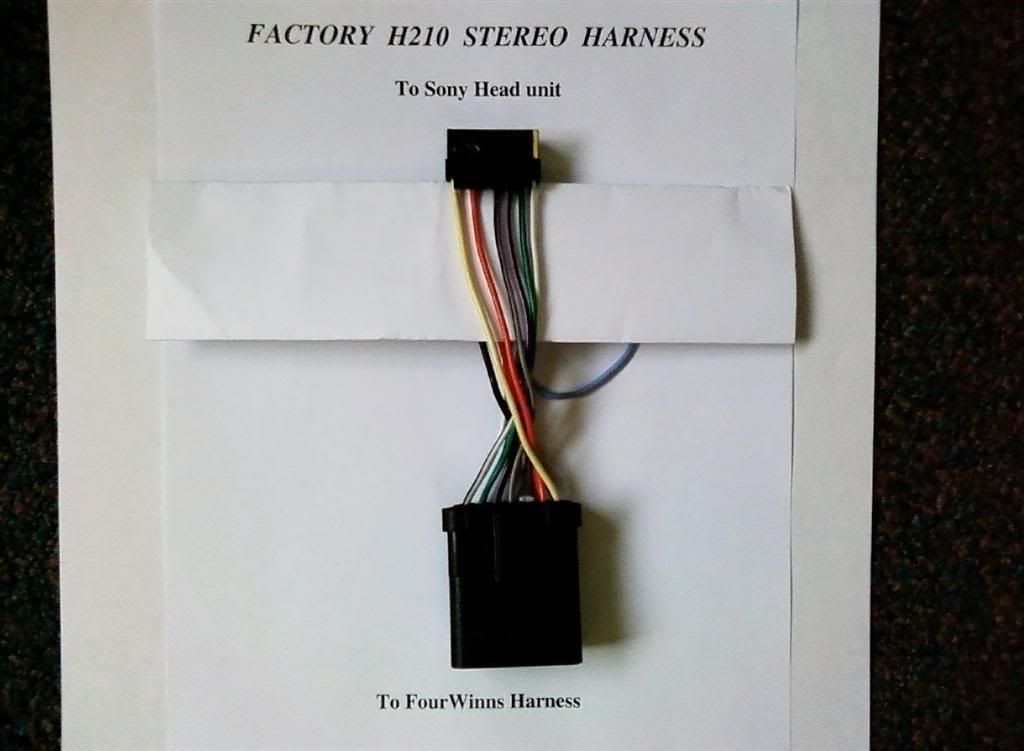
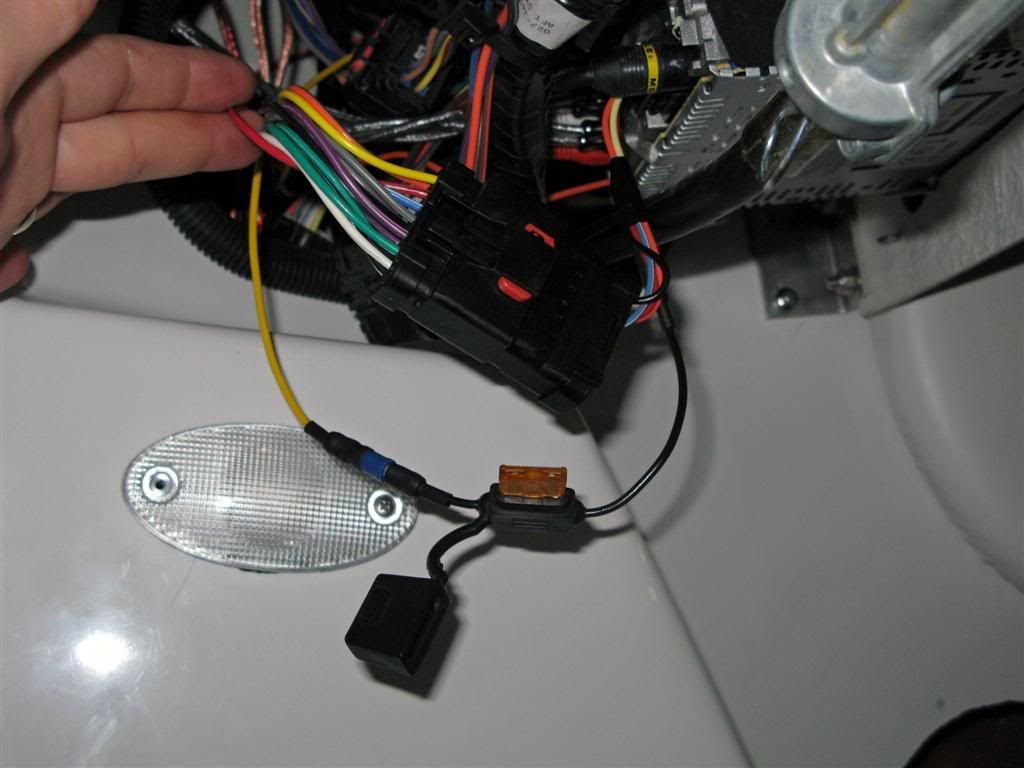
I removed the stereo to boat harness and photo’d it in case I ever wanted to return it to factory - a simple unplug deal. With a tiny flathead jewelers screwdriver I dismantled the FourWinns side of the stereo jumper harness and carefully unclipped & removed all the wires which would now be unused - except the remote switch wire for the amp (blue/wht stripe), power on acc (red), power illum (orange), ground (blk) and the power for setup memory (yellow). The remote amp switch wire is factory terminated a little further up the helm harness so I just followed it and added a bullet connector then used another 2' of wire to get me to the amp location.

Image

The power for setup mem (yellow) got a bullet connector, an in-line 1A fuse (don't know why but thought it would be a good idea). Another bullet connector ties it to the power/ground loom for the amp.

Image

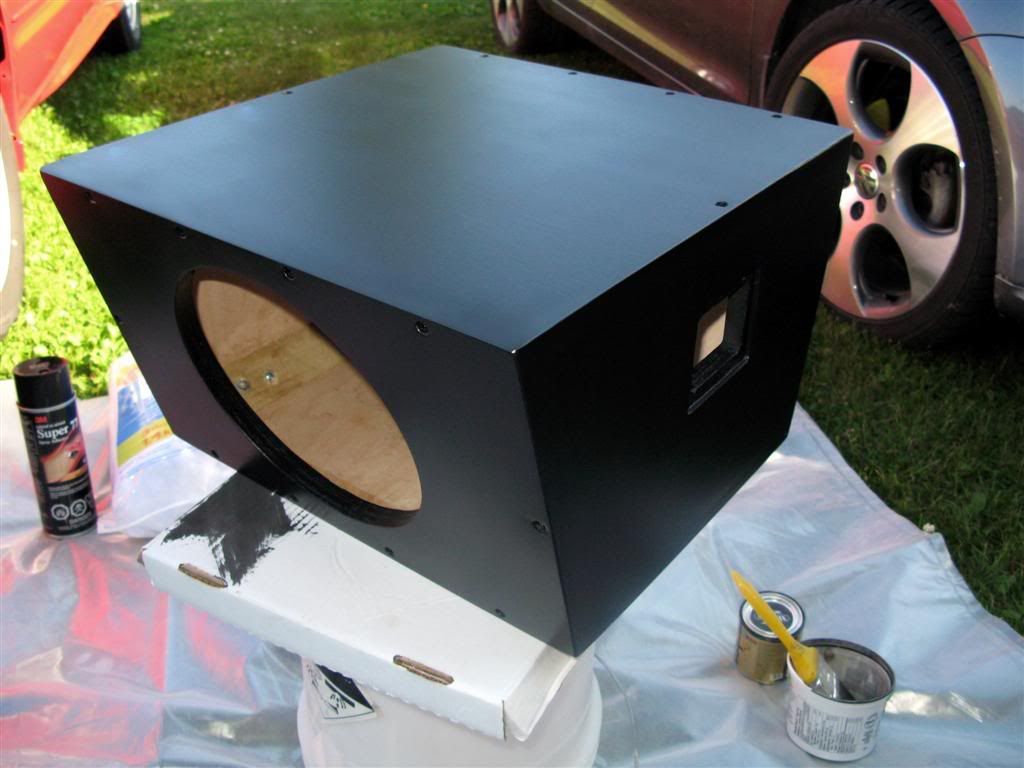
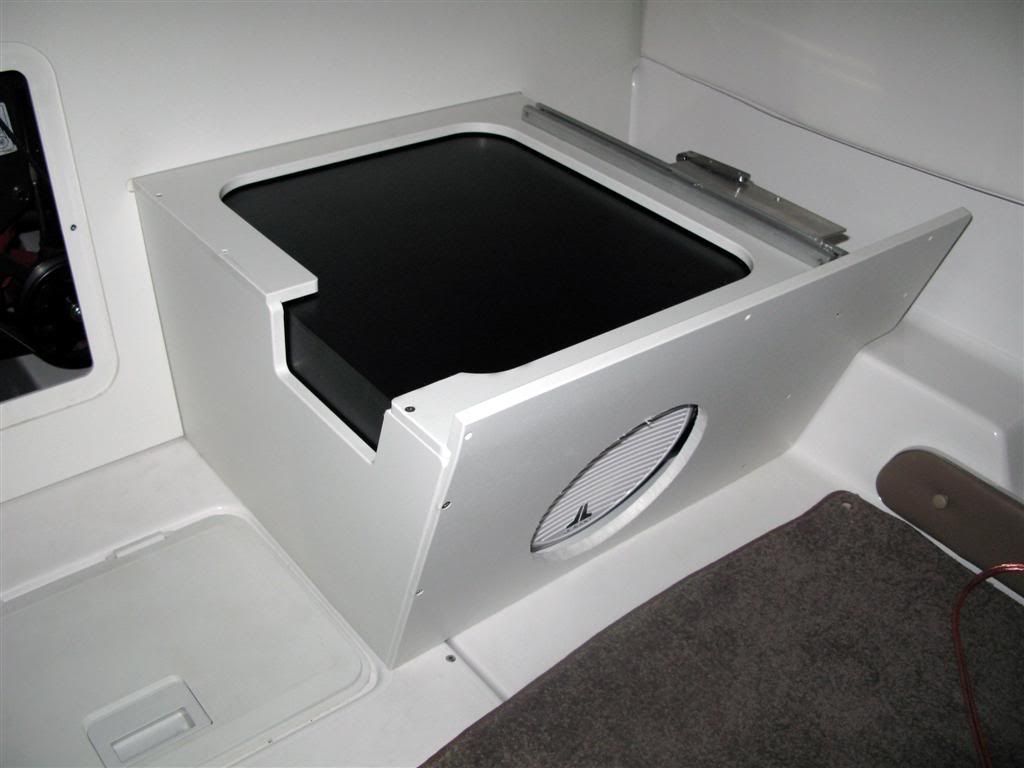
Then I tackled the sub box. After much thought I decided that my priority was to have decent thump while having a non-destructive and stealth install. Ultimately I adjusted my plan to a little better strategy submitted by Jim_R (thanks Jim!). The box was carefully sized to fit exactly in the cubby under the rear bench on the port side.
Angles I used were 9deg for the aft cuts and 15deg for the front.
1/2 sheet of 3/4" good one side hardwood ply was used (MDF was too offended by water and I did not feel like doing any fiberglass) with 2"x 2" poplar sticks being 45deg'd for inside reinforcement. I used construction adhesive liberally to glue and seal the thing and #10 2" wood screws to assemble it on the outside (1 1/4" on the inside reinforcements). It then got 3 coats of black varathane and 2 coats of clear satin varathane spray.
Counter-sunk the hole for the wire hookup block (it was that snug in the bench cubby) and since I was approximately .1 - .2 cu.ft. shy of my recommended min, I added a little bit of stuffing.

Image

The small strip fixing the seat frame to the floor was flipped to the outside of the seat frame from the inside and the box was sized to allow little rubber "feet" or bumpers to be added to the bottom of the box prior to fitting it in there. The seat cushion itself did not require removal but it did make the install less of a headache (literally). :roll:
An access for the wire hookup/disconnect is through a small hole cut in the seat frame on the side. I marked the hole with a red and black dot also since I can't actually see in there and do not entirely trust my memory.

Image

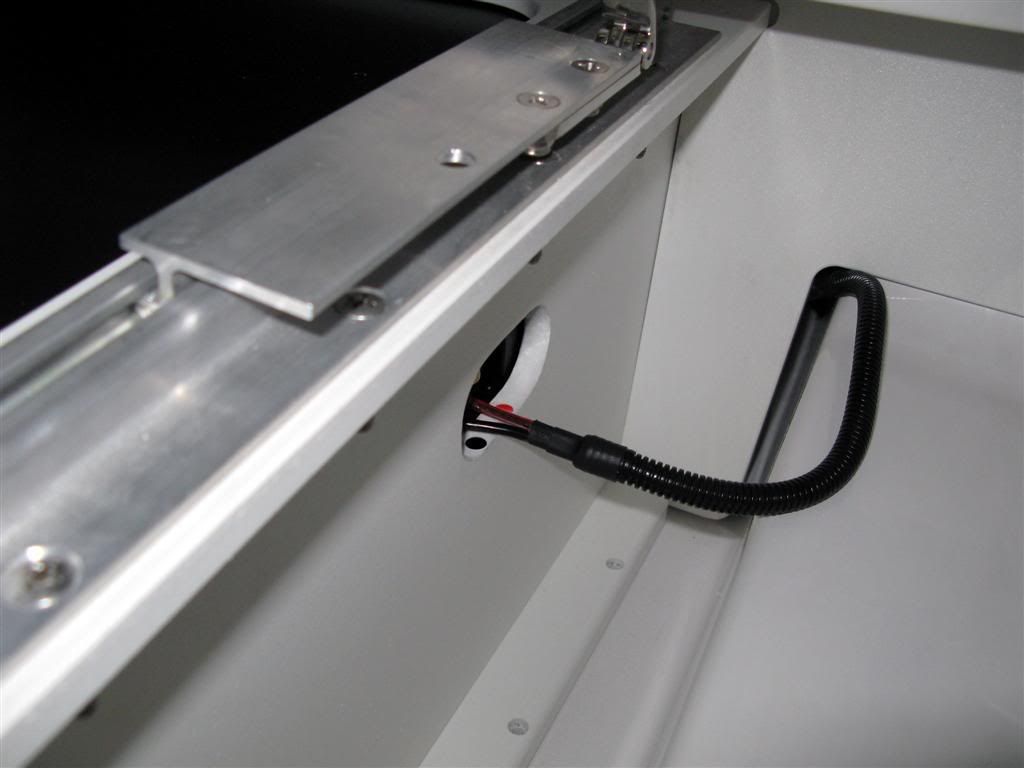
The plastic bench "kick panel" and seat frame front must be removed and may then be cut accordingly. The sub box can slide right in the void and get hooked up. The wire for the same was run just as the amp power/ground was except on the port side.

Image

All that’s left after that is re-assembly and hook up the amp. Then jump back to the power cables, hook them up and throw the big red switch so to speak. The memory wire is visable here on batt 1 with the amp power. Both factory batteries are "cranking" - I will swap battery 1 with a deep cycle later if there is ever an issue but FW and Volvo say not to try starting off one so we'll have to cross that bridge when/if we get there.

Image

A little tuning of the amp and set up the head unit (since it will now “remember” my prefs) :wink: and we are good to go! :D
As of now I haven’t “vented” the kick panel of the bench for the sub. It seems to thump pretty good for my taste and the bench is such that it is vented pretty well in its design from the factory. If I had a pro do the install it could probably be set up much better than it is; but I could also be a few thousand lighter as well. It sounds awesome AFAIAC and without including time I figure I am probably into the whole upgrade for $1500 so that is pretty cheap considering what the hard-core guys are spending on this stuff. I can hear it in perfect clarity over the engine and the wind so that is really all I wanted out of it and I am sure that is already more than enough to be obnoxious on the water. Like Tx said it is pretty cool to feel the thump in the floor and seat and frankly, I haven't had any rattles to bug me just yet . . . 8)

_________________
2008 Four Winns 210 5.7 GI/SX
2007 GMC Sierra 2500 Crew
1966 Fed-Up Wife


Last edited by Blessed on Mon Jun 30, 2008 10:52 pm, edited 2 times in total.

Top
 Profile  
 
PostPosted: Mon Jun 30, 2008 9:34 pm 
Offline
230 Mike
User avatar

Joined: Mon May 15, 2006 7:59 pm
Posts: 5141
Location: Kansas City, Table Rock Lake
That is a wicked nice install!!! The security torx screws may be overkill but the look is awesome. Where did you get the SS ones? Sealing the end of the loom, great attention to connectors - just fantastic. I enjoy an AR install more than the finished product, I think ;) .

_________________
Image

Mike
2005 Four Winns 230/240
VP 5.7GXi/DP
1998 F-150 XLT
Boat Pic


Top
 Profile  
 
PostPosted: Mon Jun 30, 2008 9:47 pm 
Offline
email admin your custom rank

Joined: Mon Aug 06, 2007 9:02 am
Posts: 616
Location: Miami, FL
Looks fantastic! Great job!!

_________________
Walter
Image
2003 248 Vista - VP 5.0 GXi
2009 Toyota Tundra SR5 5.7L 4x4


Top
 Profile  
 
PostPosted: Mon Jun 30, 2008 9:58 pm 
Offline
email admin your custom rank

Joined: Thu May 18, 2006 8:57 am
Posts: 471
Very nice! You'll love those JL Audio speakers. I like the idea of the torx screws. Theft is somewhat a worry of mine.

_________________
Former owner of:
1996 Four Winns Horizon 200 5.8L VP
2006 Four Winns Horizon 260 8.1L VP
2007 Sea Ray 290 Sundancer

Current boat
2004 Sea Ray 290 Sun Sport Twin 350 Mags

Image


Top
 Profile  
 
PostPosted: Mon Jun 30, 2008 11:05 pm 
Offline
email admin your custom rank

Joined: Wed Mar 12, 2008 9:49 am
Posts: 401
Location: Eastern Canada
230 - Yep AR is a tough thing to overcome, you can see I am losing the battle. However, I can take comfort in knowing my work is at least as good as the factory - actually noticed that original speaker holes (amongst others) were cut uneven by quite a bit.

Yeah Cincy. A torx will not actually fit even with the pin drilled out; I experimented with a spare. They are an odd (special?)size and/or a wierd layout.
They were pricey but i figured (like the trailer tongue lock) I don't need to make it impossible to rip off my stuff - only harder than it is to rip off someone else's. The little peasants that do stuff like that usually do it with a easy mark. Make it tough and they just go elsewhere.

Anyone thats interested can check out these guys. I did not get mine there (I got mine local) but they give you an idea of whats available. Be warned though - these things are expensive - like a buck a piece and up!

http://www.tamperproof.com/

_________________
2008 Four Winns 210 5.7 GI/SX
2007 GMC Sierra 2500 Crew
1966 Fed-Up Wife


Top
 Profile  
 
PostPosted: Mon Jun 30, 2008 11:26 pm 
Offline
230 Mike
User avatar

Joined: Mon May 15, 2006 7:59 pm
Posts: 5141
Location: Kansas City, Table Rock Lake
Thanks for that link. I'm always needing sources like that for odd stuff. Usually after the guy at Ace looks at me like I have a 3rd nipple.

Your work isn't "as good" as the factory. Your work makes the factory's look like CRAP.

The duct tape on the Dremel has to go, however :D .

_________________
Image

Mike
2005 Four Winns 230/240
VP 5.7GXi/DP
1998 F-150 XLT
Boat Pic


Top
 Profile  
 
PostPosted: Tue Jul 01, 2008 5:03 am 
Offline
email admin your custom rank

Joined: Wed Dec 12, 2007 3:56 pm
Posts: 1046
Location: Millhaven, ON
Very nice job indeed! There is nothing better than the feeling of accomplishment you get when you do something yourself. I am not to "up" on stereo's but I really need to consider something, we just can't hear our radio while underway and I don't have a means of connecting my mp3 player. I have an old Kenwood setup with a 6" kicker tube in my old jeep comanche, I'll start another thread and see if somebody can help me cipher it out.

Again, NICE job... I get dibs on those old speakers though! (if your not planning on keeping them!)

_________________
Marc, Kathlin & Nathalie

Image
'89 Chaparral Laser 32

'93 Vista 245, 5.8L w/ King Cobra

Former Boats
'01 H260, 7.4 VP Duoprop
'98 H200, 5.0 GL w/VP SX drive


Top
 Profile  
 
PostPosted: Tue Jul 01, 2008 8:05 am 
Offline
GIDDY UP

Joined: Fri Mar 14, 2008 3:08 pm
Posts: 856
Location: Tulsa, OK
FANTASTIC!!!!!!!!!!!!!!!!!!!!!!!!!!!!!!!!!!!!!!!!!!!!!!!!!!!!!!!!!!!!!!!!!!
I'm still geeking out about the sub box. WOW.


BTW, the amp will get HOT. When you're stopped, prop that cusion up for ventilation. I can get about 2 hrs of full volume play 95 degrees, full sun.

_________________
Image
H210SS 6.2
F150 Platinum


Top
 Profile  
 
PostPosted: Tue Jul 01, 2008 9:58 am 
Offline
Just-N-Paradise

Joined: Tue Mar 27, 2007 1:15 pm
Posts: 222
Location: Trophy Club, TX
Seriously that is the cleanest "amateur" install I have ever seen! Before I decided to install my system myself, I took the boat to a few audio shops around here and their work wasnt as clean as yours. Pat yourself on the back!

Here's what I just picked up off craigslist:
JL 12W6V2
Image
Image
JL 500.1 monoblock amp
Image

Im modifying a box I already had, so once I get it back from being sprayed with rhino liner, the boats gonna be bumpin

_________________
2007 Four Winns 220SS (Sold!!)
2006 Toyota Tacoma


Top
 Profile  
 
PostPosted: Tue Jul 01, 2008 10:07 am 
Offline
Narwhal
User avatar

Joined: Mon Feb 26, 2007 10:29 am
Posts: 1035
Location: Chicago, IL
Very nice work! - and believe me, I can appreciate just how much work it is too. Bet it sounds great. 8)

I got my sub in this past weekend, and also didn't port the kick panel of the bench. Doubt I will at this point, as there's plenty of thump for me.

_________________
2007 Horizon 200
4.3L GXi/ SX 225 HP


Top
 Profile  
 
PostPosted: Tue Jul 22, 2008 2:50 pm 
Offline
email admin your custom rank

Joined: Wed Feb 13, 2008 10:11 am
Posts: 663
Location: Corinth, TX
I'm speechless.................As all others have said....Fantastic! I was thrilled with my stereo upgrades until I saw this. Now I love your boat inside as well!!! :mrgreen:

_________________
2008 H210SS VP 5.7 Gi/SX
2011 Ford F150 FX4 EB
Image


Top
 Profile  
 
PostPosted: Mon Dec 01, 2008 4:19 pm 
Offline
Dolphin

Joined: Wed Jul 30, 2008 11:18 am
Posts: 91
Location: Ontario, Canada
I would seriously be interested in having you install the same system in my new 210SS. Interested?

_________________
2008 H210SS Yellow VP 5.7 GXi 320 HP (sold May 2010)
2008 Mercedes ML 320 CDI Diesel


Top
 Profile  
 
PostPosted: Mon Dec 01, 2008 5:21 pm 
Offline
email admin your custom rank

Joined: Mon Aug 27, 2007 7:36 am
Posts: 678
Location: Northshore Boston & 1000 Islands
Nicely Done!.... I use Tamperproof Screw COMPANY for many fastners on my cars and Trailers as well... They are good stuff.

_________________
Image
08 H260 VP 8.1Gi DP.....Previous
2013 Crownline E6 Merc 8.2MAG BIIIX, DTS/SC


Top
 Profile  
 
PostPosted: Wed Dec 03, 2008 3:46 pm 
Offline
All Night Long
User avatar

Joined: Fri Jul 06, 2007 12:03 am
Posts: 1899
Location: Lake Washington, Seattle, WA
This is a great example of someone really "taking it to the next level".

That kind of finish work is not typical of any shops or professional work that I have ever come across. This is super impressive.

Great decision #1 = Using the JL stuff
Great decision #2 = building a custom box for the sub (sounds a heck of alot better than infinite baffle, but alot more trouble that most of us wanted to go)
Great decision #3 = man - the finish work. Screws, sealing off wires/harnesses, running wires well, everything.

I am sure that the boat ROCKS.

Your wife should really be able to appreciate the level of qualify - at low volumes just as at high volumes (I know my wife did).

Excellent work!

_________________
Image
2008 318 Vista -SOLD, but I am still around!
All Night Long, Seattle WA


Top
 Profile  
 
Display posts from previous:  Sort by  
Post new topic Reply to topic  [ 14 posts ] 

All times are UTC - 6 hours [ DST ]


Who is online

Users browsing this forum: No registered users and 41 guests


You cannot post new topics in this forum
You cannot reply to topics in this forum
You cannot edit your posts in this forum
You cannot delete your posts in this forum

Search for:
Jump to:  
Powered by phpBB® Forum Software © phpBB Group